My iPhone Photos app is full of duplicate and near-duplicate pictures from years of backups, bursts, and Live Photos. It’s eating up storage and making it hard to find specific shots, but I’m afraid of accidentally deleting important memories. What’s the safest, most reliable way to detect and remove duplicate photos on iPhone, and are there any trusted apps or iCloud tips that won’t risk losing originals?
Short version. You want to clear dupes without nuking memories. Here is what works and keeps things safe.
- Turn on iCloud and protect everything first
- On iPhone go to Settings > Your name > iCloud > Photos.
- Turn on iCloud Photos.
- Wait until it says “Updated just now”.
- This gives you a full backup in iCloud before you touch anything.
- Use the built in “Duplicates” tool in Photos
Apple’s tool is conservative. It tries to keep the highest quality version and merge data like edits, favorites, albums.
- Open Photos app.
- Go to Albums tab.
- Scroll to “Utilities”. Tap “Duplicates”.
- Review pairs. You can tap “Merge” per pair or “Select” multiple then “Merge”.
- If you are scared, do a few at a time, then check “Recently Deleted”.
- Tame Live Photos and bursts
A lot of “near duplicates” are from Live and bursts.
- For Live: Open a photo > tap Live icon > choose “Off” or pick a Key Photo so you keep one good frame.
- For burst: Open burst > tap “Select…” > pick the best frames > tap “Done” > keep only favorites.
This reduces clutter without deleting memories.
- Delete safe categories first
Start with things you do not care about much.
- Screenshots. Album > Screenshots > Select > delete.
- Screen recordings.
- Blurry photos. Tap search in Photos and try “blurry” or zoom through dates and trash obvious ones.
- Duplicated downloads from WhatsApp or Messages.
- Use a cleaner app for near-duplicates
If you have thousands of photos and years of backups, manual cleanup is slow. This is where a dedicated cleaner helps, especially for similar shots, same subject, slightly different angle, etc.
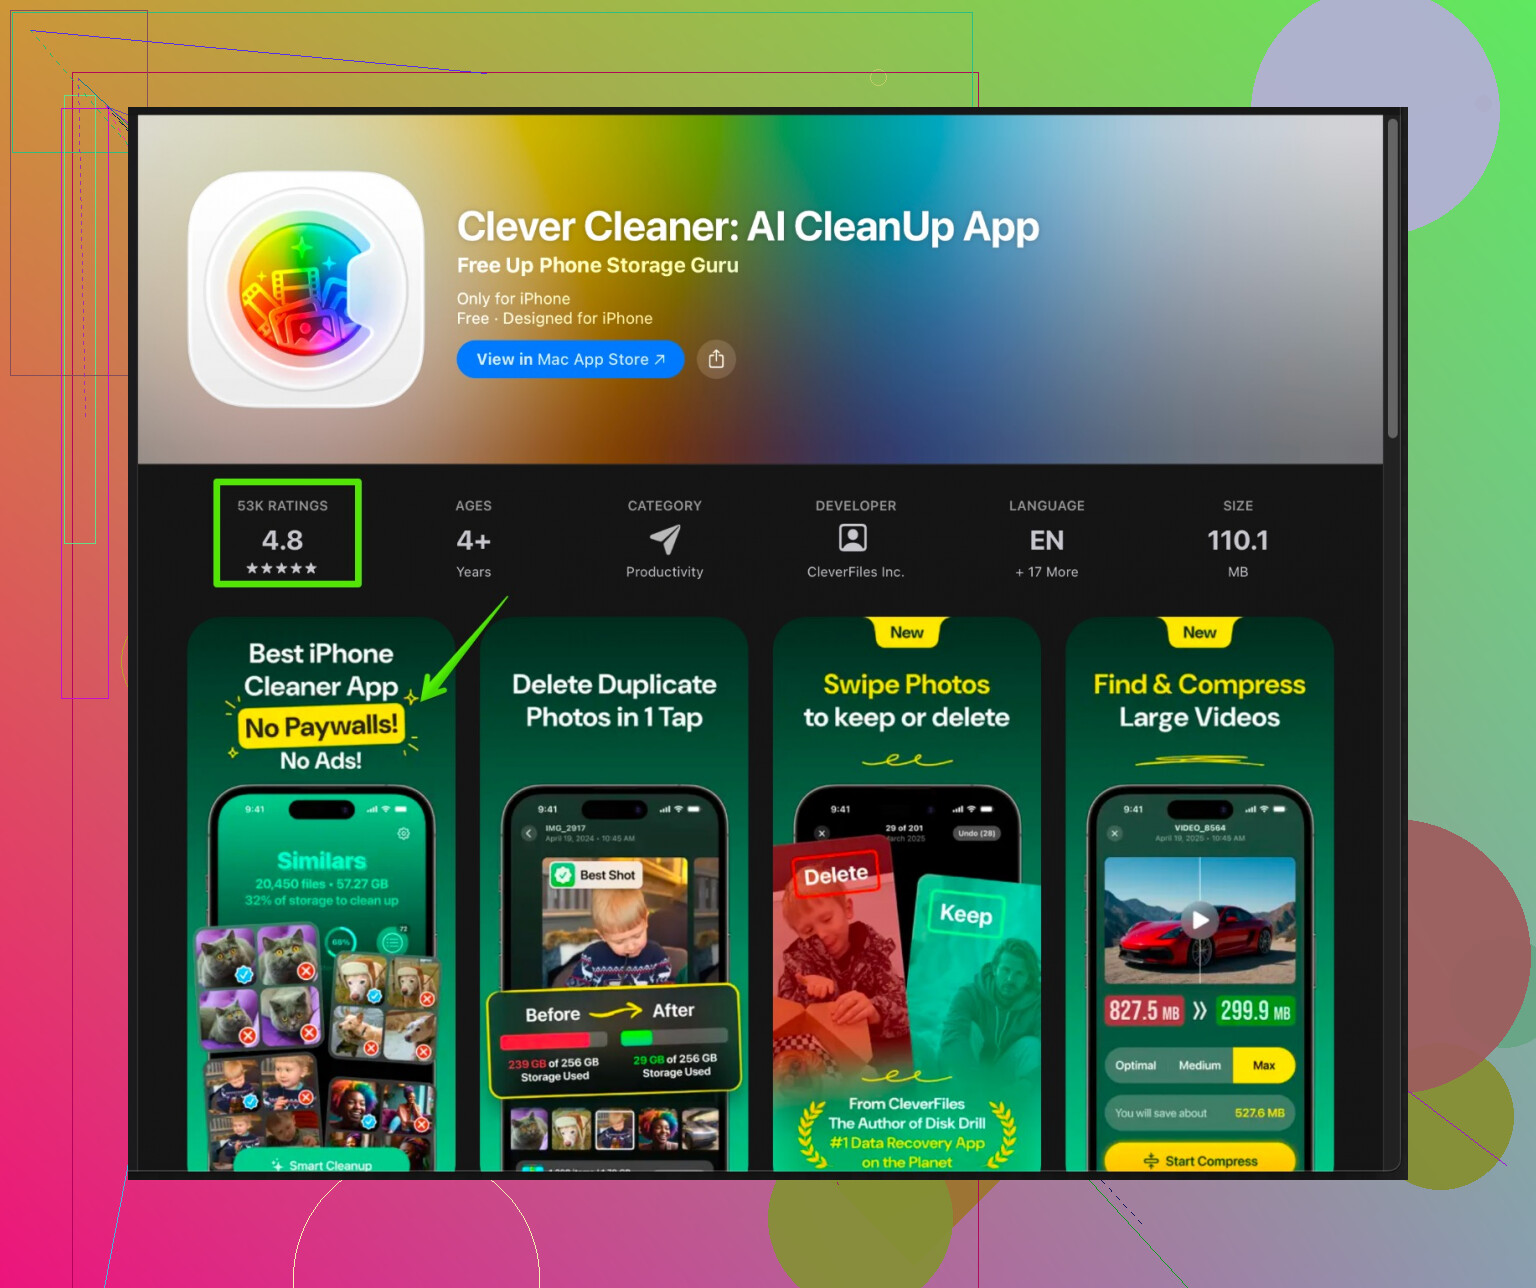
A solid option for iPhone is Clever Cleaner.
It uses AI to scan your library and group:
- Exact duplicates
- Similar photos
- Similar videos
- Screenshots and junk media
You still approve what gets removed, so you keep control. For iOS, look for “Clever Cleaner App” on the App Store. Or use this link with more details and screenshots:
Smarten up your iPhone photo cleanup with Clever Cleaner
Tip. Run any cleaner in phases.
First pass. Remove obvious dupes and junk.
Second pass. Review similar photos and keep at least one from every event or memory.
Do a quick scroll through Years view in Photos after each pass to be sure key events still look complete.
- Double safety net
- After deleting, open Photos > Albums > Recently Deleted.
- Photos sit there for 30 days. You can restore if you mess up.
- If you feel nervous, do a full computer backup too, with Finder on Mac or iTunes on Windows, so you have a frozen copy of everything.
- Keep it clean going forward
- Once a month, open Duplicates in Photos and clear new pairs.
- After trips or events, favorite the best shots, then delete the extras while it is fresh.
- Turn off auto saving of WhatsApp or similar if it keeps spamming your library.
If you do those steps in order, you free a lot of space, remove clutter, and your memories stay safe since you always have iCloud, Recently Deleted, and, if you want, a computer backup as a last resort.
Totally get the “I don’t want to lose memories, but my phone is a landfill” situation. @reveurdenuit already covered the safe built‑in route really well, so I’ll skip repeating iCloud / Duplicates / Recently Deleted and all that.
Here’s what I’d add or do differently:
1. Stop creating new duplicates first
You don’t want to clean for 3 hours just to start re‑cluttering.
- In WhatsApp / Messenger / Telegram:
Turn off “Save to Camera Roll” or “Save Incoming Media” except for chats you actually care about. - In Instagram / TikTok:
Turn off “Save original photos/videos” so you don’t get one in Photos and one saved from the app. - For Airdrop & imports:
When importing from old phones or cameras, only import once. A lot of “duplicates” are actually multiple full-library imports.
Cut the leak, then mop the floor.
2. Decide your rules for what counts as a “memory”
What freaks most people out is not the deletion, it’s the uncertainty. So set some simple rules ahead of time, like:
-
Always keep:
- One photo of each important event (trip, birthday, graduation, etc.)
- Any photo with people you rarely see or family members who are older
- Anything edited, favorited, or used as a wallpaper/profile pic
-
Safe to delete:
- Trip photos where you took 9 of the same mountain
- 15 shots of the same meal
- Accidental pocket pics, feet, car dashboards
Stick to your rules and it feels a lot less like “I’m erasing my life” and more like “I’m curating it.”
3. Use Favorites as a “do not delete” shield
Before doing any big cleanup:
- Go to Photos > Years view.
- Quickly scroll through each year and:
- Tap the heart on everything that makes you go “aww” or “oh yeah that day”.
- Now you have a “core memories” set that you don’t touch.
When you use ANY cleaner (Photos Duplicates, 3rd‑party apps, or manual), filter with this mindset:
“If it’s favorited, I don’t delete it. Period.”
This is where I slightly disagree with relying only on Apple’s Duplicates like @reveurdenuit suggests. Apple is pretty safe, but not perfect about “near‑duplicates.” For similar shots, your own favorites are a better signal of what actually matters.
4. Use a smart cleaner, but treat it like a helper, not a boss
For near‑dupes, Live Photos frames, bursts, and “almost the same” shots, a dedicated cleaner is honestly worth it if your library is huge.
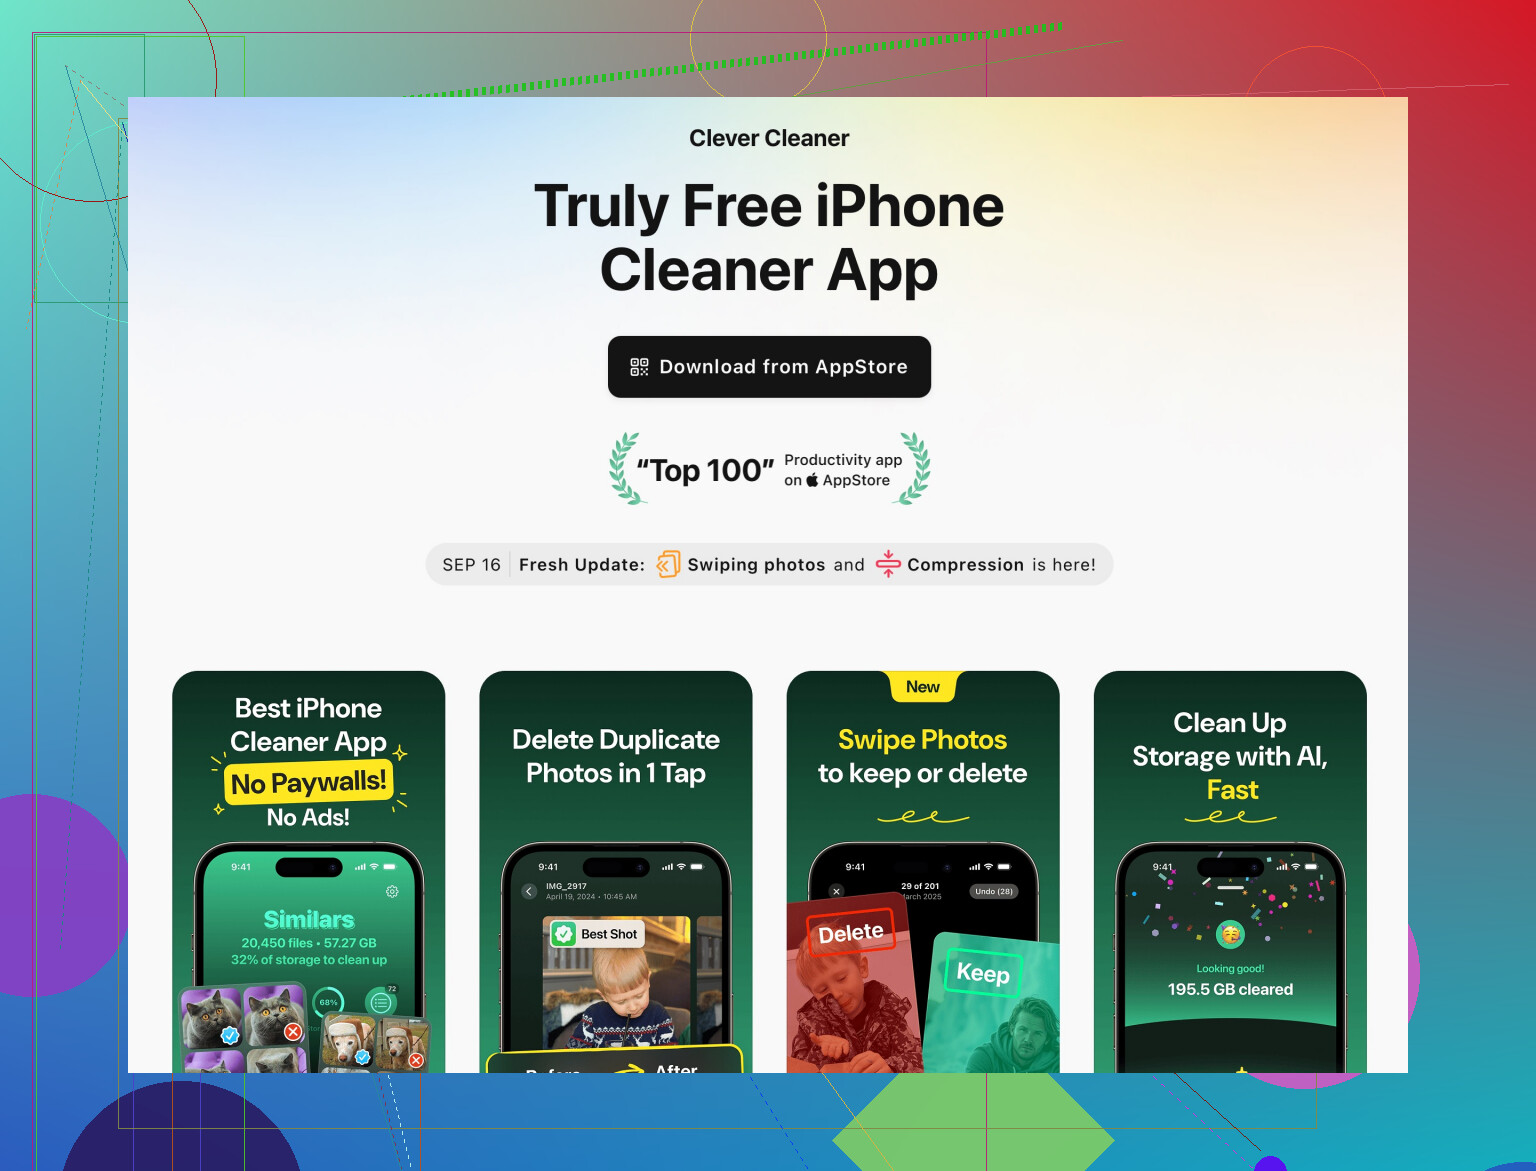
A good one for iPhone is Clever Cleaner App. It scans your library and groups:
- Exact duplicates
- Similar and near‑duplicate photos
- Similar videos
- Screenshots and random junk
The key is: you approve everything. Do it in waves:
- Pass 1:
Remove exact duplicates and obvious junk (memes, receipts, screenshots). - Pass 2:
Go through “similar photos” and always keep at least one from every event or pose. - Pass 3 (optional OCD mode):
Clean old screen recordings, downloads, and forgotten albums.
If you want more info, check out this page for the Clever Cleaner App for iPhone:
smart iPhone photo cleanup with Clever Cleaner App
It’s essentially aimed at people in your exact boat: big messy libraries, lots of duplicates, and a strong fear of losing memories.
5. Make a “panic backup” outside of iCloud
If you’re truly nervous:
- Plug iPhone into a Mac or PC.
- Use Finder (Mac) or iTunes (Windows) to do a full local backup.
- Optionally, also export all photos to an external drive so there’s a “time capsule” copy.
Now you can delete more confidently because even if you rage‑regret it in 6 months, you still have that frozen archive.
6. Use albums to preserve the story, not the clutter
Before nuking similar photos:
- Create albums like:
- “Best of 2017”
- “College years”
- “Family holidays”
- Go through and drag the best 1–5 photos from each event into these albums.
Then when you delete the extra angles and duplicates, you’re not killing the memory, you’re condensing it into a highlight reel.
7. Ongoing 5‑minute routine
Once you’ve done the painful first cleanup, keep it light:
- After trips or events:
- Same day: pick 5–10 best shots, favorite them.
- Delete the obvious fails while it’s fresh in your mind.
- Once a month:
- Check Photos > Duplicates.
- Run Clever Cleaner App for quick junk / screenshot cleanup.
- Empty Recently Deleted if you’re sure.
TL;DR:
Back up once outside iCloud, mark your true favorites, use a smart cleaner like Clever Cleaner App for bulk work, and treat duplicates as clutter around the memory, not the memory itself. You’re not deleting your life, you’re making the good stuff easier to actually see.
6 Likes
You already got solid safety nets from @cazadordeestrellas and @reveurdenuit, so I’ll focus on how to think about cleaning, plus where I’d do things differently.
1. Think in “tiers” of importance, not one giant pile
Instead of hunting duplicates randomly, split your library mentally into 3 tiers:
Tier 1: Irreplaceable
- Kids growing up
- Old relatives
- Big life events (weddings, graduations, hospital baby pics)
Rule: Never bulk delete here. Review manually, keep multiple angles if they tell a story.
Tier 2: Nice to have
- Trips, meetups with friends, dinners, sightseeing
- Selfies and casual hangouts
Rule: Keep 1 to 3 per moment. If you took 15 shots of the same sunset, choose the best 2 and drop the rest.
Tier 3: Functional or junk
- Receipts, parking signs, serial numbers
- Memes, random downloads, work-in-progress photos
- Accidental shots
Rule: These should be the first to go. No nostalgia required.
Use search in Photos to skim: try “receipt,” “screenshot,” “document,” “whiteboard,” “dog,” “food,” and mass delete the non-memory stuff.
2. Albums that protect your “core story”
Where I slightly diverge from the others: I would not rely only on Favorites as your memory shield. Once you have thousands of favorites, that list becomes unmanageable.
Do this instead:
-
Create 2 or 3 high-level albums:
- “Core Memories”
- “Best Trips”
- “Family Highlights”
-
In Years view, drag only the top photos from each year into those albums. Think of them as your personal museum.
-
When you eventually use any cleaner (Apple’s Duplicates, Clever Cleaner App, etc.), treat those albums as sacred. If you are ever in doubt about deleting a photo, check whether that period is already represented in one of those albums.
This way your life story is preserved, even if you later get a bit aggressive elsewhere.
3. How to handle Live Photos without killing the moment
Others said “turn Live off,” which is fine, but you may actually like Live Photos for kids, pets and action. Instead of turning them all off:
-
For special shots:
Keep Live on, but choose a better Key Photo (swipe through frames, pick the best face), then leave the rest. You get the moment plus the motion. -
For clutter shots (random stuff, food, objects):
Convert them to stills. On a batch of these, you can edit to “Duplicate as Still Photo” or just turn off Live to save a bit of space and make everything cleaner visually.
So rather than globally disabling Live, use it strategically where motion adds value.
4. Where a cleaner app actually helps (and where it can be risky)
You mentioned near-duplicates and old backup junk. This is exactly where a tool like Clever Cleaner App becomes useful.
Not repeating steps already covered, just what matters in practice:
Pros of Clever Cleaner App
- Groups similar and near-duplicate photos visually, not just based on file data. Helpful when you have many angles of the same scene.
- Can separate categories like screenshots and junk media, which speeds up clearing Tier 3 stuff.
- Lets you review groups before deleting, so you stay in charge.
- Saves time if your library is 20k+ photos and growing.
Cons of Clever Cleaner App
- Any smart cleaner can recommend deleting photos you personally like. If you tap through too fast, you may lose shots you would have kept.
- Requires a bit of attention. It is not a “press one button and trust it forever” kind of thing.
- If your library is small, the time you spend learning it may not be worth the benefit.
Competitors and Apple’s own Duplicates pane lean a bit more conservative, which is great for safety but not always great at catching similar-but-not-identical bursts and Live Photos. That is where Clever Cleaner App has the edge, as long as you treat its suggestions as drafts, not commands.
Best approach is to start with:
- Screenshots and junk categories.
- Exact duplicates only.
- Then move gradually into “similar” groups once you are comfortable.
5. Do not over-trust automation, even Apple’s Duplicates
One point where I disagree slightly with the relaxed attitude some people have toward the built-in Duplicates section: it is really good, but it is still algorithmic.
- If both versions are meaningful in different ways (e.g., one lightly edited, one original, different crop), I would not merge automatically.
- Before hitting Merge on large batches, scroll briefly and see if any pair points to very different contexts, such as different albums or edits.
Treat Apple’s Duplicates and any 3rd party tool as a sorting assistant that bubbles up easy wins for review, not an infallible judge.
6. Simple habits to keep future you from suffering again
You have the safety advice already, so here are habit tweaks instead:
-
After each trip or event:
- Same evening or next day, pick your absolute top 5 to 10.
- Add those to your “Core Memories” or “Best Trips” album.
- Delete obvious misfires while the memory is fresh.
-
Once a month:
- Scan Photos > Duplicates and clear small batches.
- Open Clever Cleaner App just for screenshots and downloaded junk. Do not even touch “similar photos” that time if you are tired.
Think of this like tidying your desk weekly instead of waiting until you cannot find the keyboard.
If you combine:
- Tiered importance (so you know what is truly sacred),
- A few curated albums,
- Very cautious use of Apple’s Duplicates plus a smart helper like Clever Cleaner App,
you end up with less clutter, more space, and a photo library that actually shows your life instead of thirty near-identical shots of the same coffee.